Patterns and best practices
Table of Contents
- Patterns and best practices
Components
Use functional components instead of class components.
Why? Functional components are easier to read and test, therefore easy to maintain and be understood across all the team.
// Bad
class MyComponent extends React.Component {
  render() {
    return <p>{this.props.myProperty}</p>;
  }
}

// Good
function MyComponent({ myProperty }: Props) {
  return <p>{myProperty}</p>;
}
Component file structure
Each component should be declared in its own folder (inside the components folder), which contains the following files:
MyComponent/MyComponent.tsx: Contains the component itself (React).MyComponent/MyComponent.spec.tsx: Contains the tests to the component (Jest).MyComponent/MyComponent.module.scss: Contains the styles declaration to the component (SASS).
Also, the component should be exported in the components/index.ts file, to be easily accessible from any place of the application
Component Properties
The properties passed into the component should be native-type properties (where possible).
Why? Declaring the properties that a component accepts one-by-one makes the component usage easier. Also, it prevents child components from accidentally accessing/modifying properties in the object that aren't intended for them.
// Bad
const values = { name: 'Name', description: 'Description' };
<MyComponent values={values} />

// Good
<MyComponent name="Name" description="Description" />
Receiving properties
Always destruct the properties object, instead of using the props object.
Why? It will make the component cleaner and easier to read.
// Bad
function MyComponent(props) {
  return <p>{props.myProperty}</p>;
}

// Good
function MyComponent({ myProperty }: Props) {
  return <p>{myProperty}</p>;
}
Properties type checking
Always use TypeScript interfaces to validate the properties types.
export interface Props {
  myProperty: string;
}

function MyComponent({ myProperty }: Props) {
  return <p>{myProperty}</p>;
}
More info here.
Components internal logic
Try to keep the component simple, move internal logic to functions outside the component whenever it's possible.
Avoid overflowing the component with auxiliary code that will make the component very difficult to read and understand. Elegance is key 👌🏼
Why? It's probably easier and more natural to add internal logic to the component every time it's necessary, but that will make the component less readable over time.
// Bad
function MyComponent({ myProperty }: Props)) {

    let textToShow = '';
    switch(myProperty){
        case 'A':
            textToShow = 'Value is A';
            break;
        case 'B':
            textToShow = 'Oh no! The value is B';
            break;
        case 'C':
            textToShow = 'Do you C what is happening?';
            break;
        default:
            textToShow = 'Whatever';
    }

    return <p>{textToShow}</p>;
}

// Good
function MyComponent({ myProperty }: Props) {
    return <p>{getTextToShow(myProperty)}</p>;
}

function getTextToShow(myProperty: string): string {
    switch(myProperty){
        case 'A':
            return 'Value is A';
        case 'B':
            return 'Oh no! The value is B';
        case 'C':
            return 'Do you C what is happening?';
        default:
            return 'Whatever';
    }
}
useCallback
Callback functions created inside React components and sent to sub components (or other usage outside of the component) will be recreated every time the component is rendered. This leads to unnecessary re-renders in all sub components receiving that function through props.
Unnecessary re-renders lowers performance, but could also potentially lead to unwanted effects because components render without having any actual changes (like if the callback function is recreated, but no other props/state has changed) by triggering useEffect hooks or other logic triggered by re-renders.
// Bad
import react from 'react';

function SomeComponent() {
  function handleCloseDrawer() {
    setIsDrawerOpen(false);
  }

  return <SubComponent onCloseDrawer={handleCloseDrawer} />;
}

// Good
import react, { useCallback } from 'react';

function SomeComponent() {
  const handleCloseDrawer = useCallback(() => {
    setIsDrawerOpen(false);
  }, [setIsDrawerOpen]);

  return <SubComponent onCloseDrawer={handleCloseDrawer} />;
}
Conditional rendering
Conditional rendering should be done inline for a more linear code reading experience. (1)
If the component(s) rendered based on the condition is too complex, or has a natural connection through their role or common feature, possibly for reusability, the components could instead be moved into a separate component. (2)
A separate component should also be used instead of messy ternary operators, even if it is not a candidate for reusability outside the module. (3)
Consider what conditions belongs naturally in the surrounding logic, and what belongs inside the rendering logic. For instance, a toggle state specific too the UI that renders a reusable component, belongs outside the component. However, if the component renders a specific entity, and one of the known properties of that entity is a value that can be controlled through a CMS for hiding that specific entity, it could make more sense to have that condition inside the component instead of in the parent that renders it.
If the conditions is complex, they should be assigned to a variable with a name that makes the complexity easier to understand. (4)
// Bad
function MyComponent({ type, title, message }: Props) {
  return (
    <>
      <ComponentWithoutConditions />
      { type === 'Error'
          ? <Icon type="error-message" />
          : type === 'Warning'
              ? <Icon type="warning-message" />
              : <Icon type="info-message" />
      }
      {getFoo()}
      {getBar()}
    </>
  );

  function getFoo() {
    if (!foo) return null;

    return <Foo />;
  } // (1)

  function getBar() {
    if (!bar) return null;

    return <BarComponent>{/* 25 lines of JSX */}</BarComponent>;
  } // (2)
}

// Good
function Bar() {
  return (
           <BarComponent>
             {/* 25 lines of JSX */}
           </BarComponent>;
  )
} // (2)

function MyIcon({ type: string }): JSX.Element {
  switch(type){
    case 'Error':
      return <Icon type="error-message" />;
    case 'Warning':
      return <Icon type="warning-message" />;
    default:
      return <Icon type="info-message" />;
  }
} // (3)

function MyComponent({ type, title, message }: Props) {
  const barIsOpen = (time > openingHours && time < closingHours); // (4)

  return (
    <>
      <ComponentWithoutConditions />
      <MyIcon type={type} />
      {foo && <Foo />}
      {barIsOpen && <Bar />}
    </>
  );
}
Styling
Use CSS modules instead of importing plain stylesheets or using styled-components.
/* MyComponent.module.scss */
.myComponentText {
  color: green;
}
import styles from 'MyComponent.module.scss';

function MyComponent({ myProperty }: Props) {
  return <p className={styles.myComponentText}>{myProperty}</p>;
}
Naming convention
The class names should be written in camelCase.
- In CSS: declare the
.className - In TSX: use
styles.className
Eufemia's CSS Custom Properties
When possible, use Eufemia's CSS Custom Properties.
A list of all properties can be found here.
/* Bad */
.myClass {
  padding: 1rem;
  color: #007272;
}

/* Good */
.myClass {
  padding: var(--spacing-small);
  color: var(--color-sea-green);
}
Styles library
The @pm-netbank/styles library provides some styling features that you can use and add to the applications.
Global styles
The global styles should be imported in the wrap-element.js file.
import '@pm-netbank/styles/src/global.scss';
This will import some global styles that make all the applications have a similar look and feel (for example, the body background-color is set in this file);
Responsive breakpoints
In some scenarios, it is necessary to write conditional styling based on the screen size.
In order to do that, should be used the same breakpoint values in all applications. Those breakpoint values are available through Sass variables in the breakpoints file.
To use them, you need to import the file into your own .scss file.
@import '@pm-netbank/styles/src/breakpoints.scss';

@media (min-width: $layout-small) {
  ...;
}
The available values are the ones provided by Eufemia.
Testing
In order to have a sustainable and reliable codebase, we should try to keep our testing coverage as high as possible.
We should follow a TDD (Test Driven Development) approach which will guarantee a better link between the tests and the code and will also ensure good test coverage.
How to test
We are using Jest and React Testing Library to write and run the tests.
Using data-testid
Using data-testid as an HTML attribute in the elements you want to test, allows you to access that element easily using the test tools.
NB: All data-testid attributes will be removed when the apps are built.
// MyComponent.tsx

...
<div data-testid="my-component-element">
    ...
</div>
...


// MyComponent.spec.tsx

import { render } from '@testing-library/react';

describe('MyComponent', () => {
    it('renders the correct element', () => {
        const { queryByTestId } = render(<MyComponent />);

        expect(queryByTestId('my-component-element')).not.toBeNull();
    })
})
Naming tests
Your describe, and it blocks should be human-readable.
For example:
describe('CardItem', () => {
  it('renders the correct element', () => {
    const { queryByTestId } = render(<MyComponent />);

    expect(queryByTestId('my-component-element')).not.toBeNull();
  });

  it('renders the correct button', () => {
    const { queryByTestId } = render(<MyComponent />);

    expect(queryByTestId('my-component-button')).not.toBeNull();
  });
});
The 2 tests above would be read like this:
- CardItem renders the correct element
- CardItem renders the correct button
How to structure the test files
When there is some logic involved to render the component, the arrange step in the test can get big and complex. For example, when is necessary to render the component with one or multiple providers.
In those cases, it is recommended to create a renderComponent function in the test file to handle all of that test setup complexity.
This function should be created at the end of the file and should receive the component properties as parameters, using the Props interface (imported from the component file).
describe('MyComponent', () => {
  it('tests something', () => {
    const { queryByTestId } = renderComponent({ textProperty: 'Imsdal' });
    ...
  })
})

function renderComponent(props: Props){
  return render(<MyComponent {...props} />);
}
If it is necessary to work with context providers, those should also be received in the renderComponent function, after the Props parameter.
describe('MyComponent', () => {
  it('tests something', () => {
    const { queryByTestId } = renderComponent({ textProperty: 'Imsdal' }, makeAccountsContextState({ isLoading: true}));
    ...
  })
})

function renderComponent(props: Props, accountsContextValue: AccountsContextState){
  const providersOptions = MockProvidersOptions();
  providersOptions.withContext(AccountsContext, accountsContextValue)

  return renderWithProviders(<MyComponent {...props} />, providersOptions);
}
Avoid optional parameters
Avoiding optional parameters in renderComponent function will make the tests more readable because that way it's easy to understand what are the values the function will use for each test case. Also, it reduces the effort of understanding what are the fallback values of the optional parameters.
In short, Props and Context values should always be required. For other necessary parameters, it should be evaluated individually, always considering the readability of the code.
Default Props values
Since we send Props object as a parameter to renderComponent function, there should be a simple way to not recreate the required properties in every test case.
In order to accomplish that, we can use an object containing a fallback value for each one of the required properties.
const defaultProps: Props = {
  title: 'Title',
  subTitle: 'Sub Title',
};
When calling renderComponent, we can just override the properties we need, for example:
renderComponent({ ...defaultProps, title: 'My Title' });
Using the test-helpers library
There are some helpers created in the library @pm-netbank/test-helpers.
Check the documentation before you start creating tests.
If you have code that can be useful to other developers just add it to the library.
Mocking Providers
The test-helpers library provides a way to mock React Context Providers.
Instead of declaring all the logic to render a provider, it's possible to use the helpers to abstract all that logic.
// Bad
return render(
  <AccountsContext.Provider value={accountsContextValue}>
    <CardsContext.Provider value={cardsContextValue}>
      <MyComponentToTest />
    </CardsContext.Provider>
  </AccountsContext.Provider>
);

// Good
import { renderWithProviders, MockProvidersOptions } from '@pm-netbank/test-helpers';

...

const providersOptions = MockProvidersOptions();
providersOptions
  .withContext(AccountsContext, accountsContextValue)
  .withContext(CardsContext, cardsContextValue);

return renderWithProviders(<MyComponentToTest />, providersOptions);
Using factories
In @pm-netbank/factories there are a set of functions to help to create mock data to be used in the tests.
Each factory will create random data for the model.
It's possible to pass a base object, which will contain predefined values (that won't be overwritten by the factory function).
// Bad
const mockCard = {
  cardId: '11234567890098765434',
  cardHolderName: 'Brune Wayne',
  accountNumber: '1234567890'
};

// Good
import { makeCard } from '@pm-netbank/factories';

const mockCard = makeCard({
  base: {
    cardId: '11234567890098765434',
    cardHolderName: 'Brune Wayne',
    accountNumber: '1234567890'
  }
});
Types
If you're working with models from the API, place them in an interface in libs/pm-netbank/types, and import them as a regular module.
Otherwise, place them in your app's types (pm-netbank/<your-app>/types).
import { Card } from '@pm-netbank/types';

interface Props {
  card: Card;
}

...
Constants
If you're working with enums from the API, place them in an enum in libs/pm-netbank/constants, and import them as a regular module.
Otherwise, place them in your app's constants (pm-netbank/<your-app>/constants).
Try to avoid hardcoded strings.
Why? Using enums will make the code more readable, easier to change, and less error prone to changes. Example: Today there is a
Card Statusnamed"BLOCKED". If it is changed to"BLOCK"(or something else) in the future, we (probably) just have to update the enum for the application logic to work as expected.
// Bad
    if(card.cardStatus === 'BLOCKED'){
        ...
    }

// Good
import { CardStatus } from '@pm-netbank/constants';

...

    if(card.cardStatus === CardStatus.BLOCKED){
        ...
    }
Naming Convention
Each one of the enums should be named in PascalCase and the values in SNAKE_CASE_ALL_CAPS.
Using Hooks
Under the hooks folder, you can place your custom hooks if you need to share the state or behavior between different components of your application.
Why? Sometimes, we want to reuse some stateful logic between components.
From React documentation
P.S. hooks are free to create 😉
Using Context
Under the providers folder, you can place your custom context providers if you need to create a handler to store some data to be used in the Provider´s child components.
Why? Context is designed to share data that can be considered “global” for a tree of React components. This is better than passing the same prop down the component tree unnecessarily.
From React documentation
Usage of Eufemia components
Why does this UI Library exist?
Simply, to unify and to maintain consistency of the most commonly used HTML Elements, custom components, and patterns at DNB and to provide a platform for collaborative constant improvement. It's a part of the whole Design System. Eufemia components also ensure that we have all the accessibility boxes checked ✅
From Eufemia documentation.
In summary, every time you need a component, just check first if it exists in Eufemia.
If you have questions or suggestions just use the Slack channel for Eufemia #eufemia-web.
HTML Elements
Beyond the custom components, Eufemia also provides components to replace the most commonly used HTML elements.
So, instead of using the plain HTML elements use the Eufemia's ones when possible.
That way, you will have out of the box the DNB styling and behavior applied.
// Bad
    <div>
        <h1>Winter days</h1>
        <p>It's snowing outside</p>
    </div>

// Good
import { Div, H1, P } from 'dnb-ui-lib/elements';

...

    <Div>
        <H1>Winter days</H1>
        <P>It's snowing outside</P>
    </Div>
HTTP requests
In the global libraries, there's an API handler (@dnb/api-handler) that encapsulates all the logic of executing HTTP requests.
So, instead of using axios, fetch, or any other Javascript library, keep in mind the existence of this framework library.
Why? Instead of having multiple ways of performing HTTP requests across all the codebase, this library will ensure all the requests are executed the same, with the right configuration and response structure.
Also, keep in mind that all the API addresses should be declared in the library @pm-netbank/endpoints.
// Bad
...

const response = await fetch('/cards/259865364');
const cardData = await response.json();

...

// Good
import { HttpMethods, useRequest } from '@dnb/api-handler';
import { Endpoints } from '@pm-netbank/endpoints';

...

const cardDataRequest = useRequest(HttpMethods.GET, Endpoints.cards.cardAction('259865364'));
cardDataRequest.execute();
Lokalise text
The applications should be developed to work in a multi-language scenario (English and Norwegian Bokmål).
Setting up the translations
You can manage the translations in the Lokalise app.
These translations can be fetch to /apps/pm-netbank by using the tools/lokalise/Readme.md tool.
By following tools/lokalise/Readme.md documentation we will end up adding the command below to apps/pm-netbank/<YOUR_APP_NAME>/project.json file.
  "sync-translation": {
    "executor": "@nrwl/workspace:run-commands",
    "options": {
      "commands": [
        "ts-node ./tools/lokalise --filter=\"<YOUR_LOCALISE_TAG>\" --folder=./src/i18n/ --no-spread-keys"
      ],
      "parallel": false
    }
  }
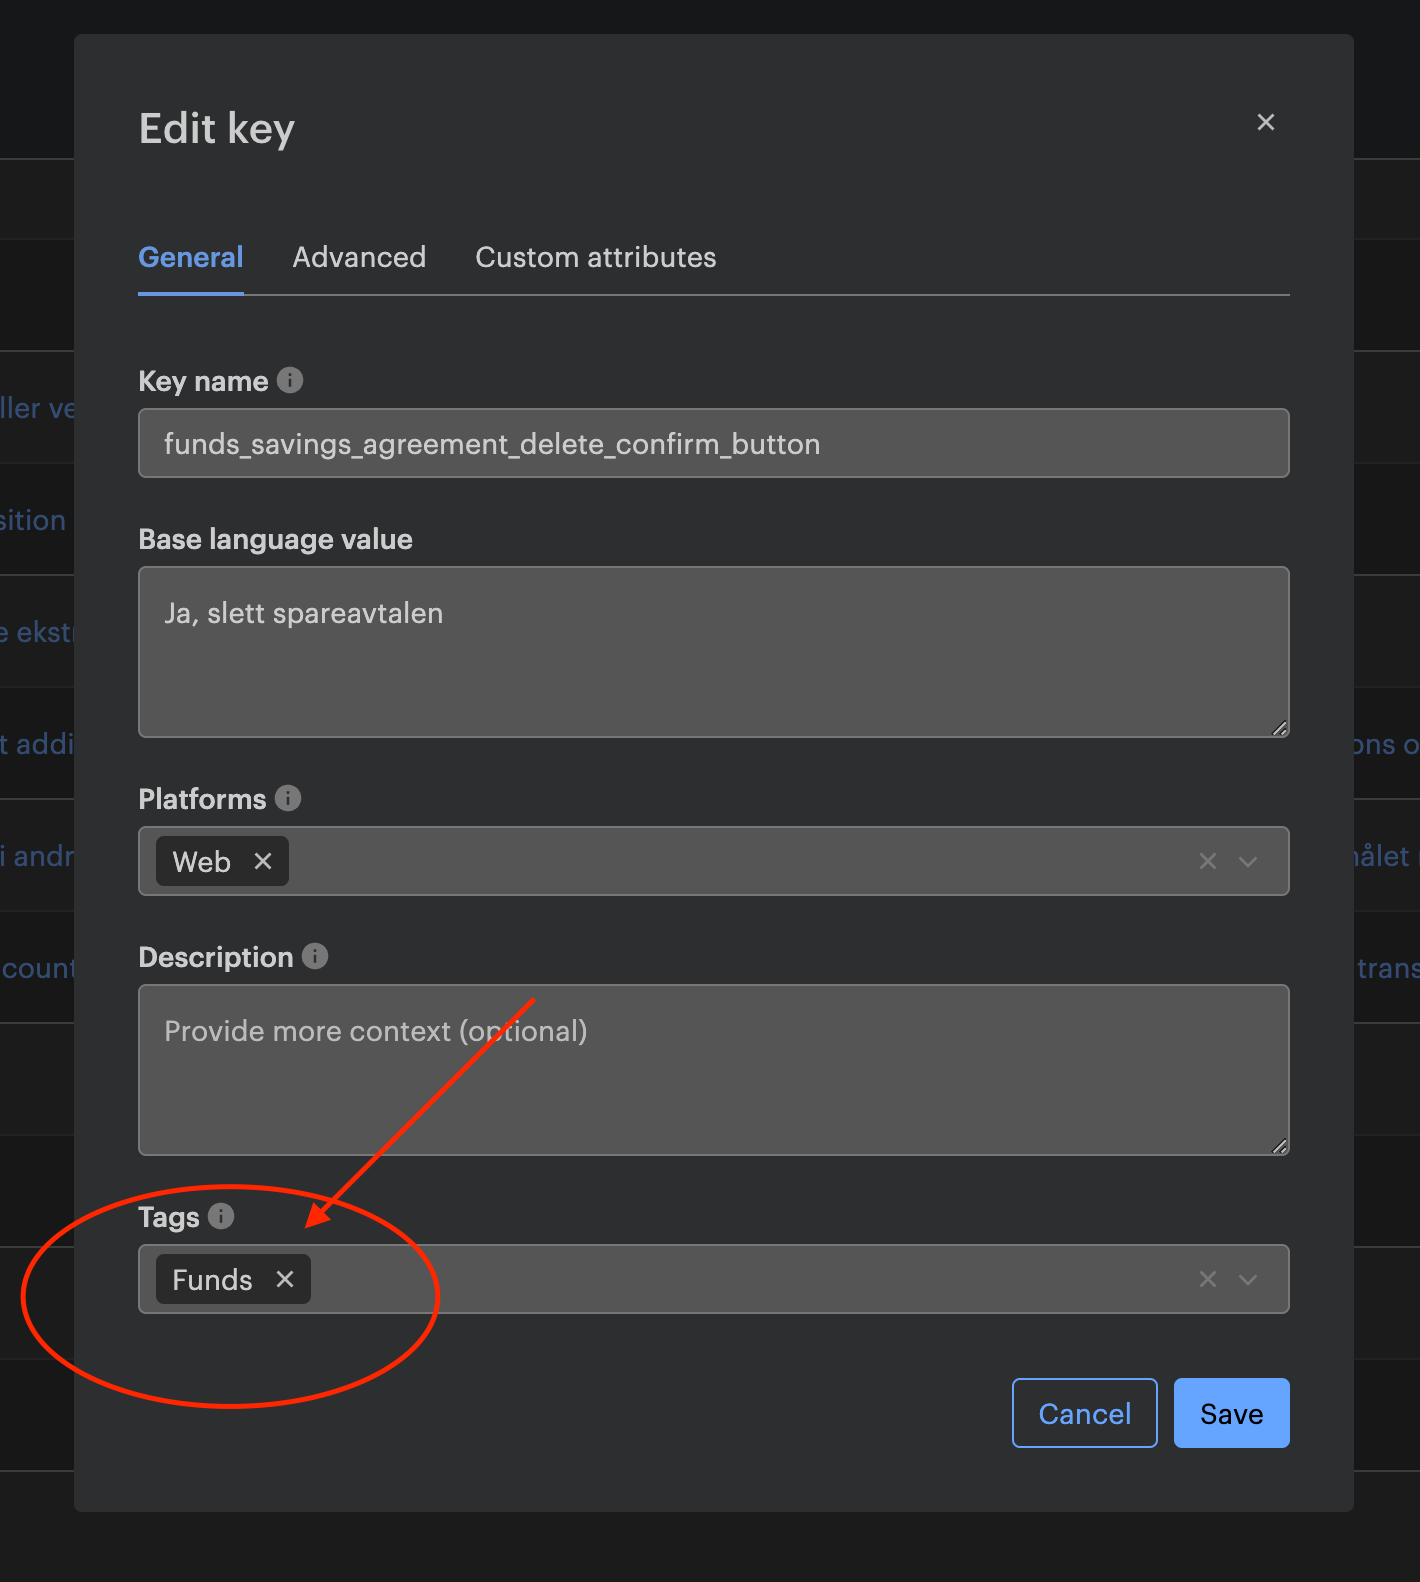
YOUR_LOCALISE_TAG is the Tags field at Lokalise platform that associates the translation keys with your app. Determined by app developer.
Fetching the translations
- Create a
.env.localfile in the root of the app. (ie.apps/pm-netbank/cards/.env.local) or if you define.env.localondnb-webroot folder, it will apply to all apps and libs. - Add this content to the file:
LOKALISE_API_KEY=YourLokaliseKey
LOKALISE_PROJECT_ID=4631029763da7bce86bcb9.95439510
- Replace
YourLokaliseKeywith your personal Lokalise API key. (Managed at Lokalise follow 👉 How to generate personal API token) - Run
yarn nx sync-translation pm-netbank/cards(example forcardsapp) to fetch the translations from Lokalise. 4.1. Command for fetching the shared translations is:yarn nx sync-translation pm-netbank/libs-i18n
Using the translations
To be possible to use the translations the app should be wrapped within the IntlProvider.
import { getIntlConfig } from '@pm-netbank/services';
import { IntlProvider } from 'react-intl';
import { translations } from '../i18n';
import { getLang } from '@dnb/locale';
...

<IntlProvider {...getIntlConfig(translations, getLang())}>
    <AwesomeApp />
</IntlProvider>
Then, in the IntlProvider child components, it's possible to use specific components to render the translated texts.
Check out the react-intl documentation to see what are the available components and API functions to use localized text.
// Component.tsx
import { FormattedMessage } from 'react-intl';
import { translationKeys } from '../i18n';

...

<FormattedMessage id={translationKeys.translation_key} />

...
Using the shared translations!
Shared translations provided via @pm-netbank/libs-i18n and accessible via the exports below.
import { translationKeys, translations } from '@pm-netbank/libs-i18n';
If above 👆 used in React Apps
import { SharedTranslationsProvider } from '@pm-netbank/libs-i18n';
SharedTranslationsProvider to be provided to the app. Mentioned at pm-netbank/libs-i18n/Readme.md.
There are cases we share translations between apps and libraries. For example in @pm-netbank/components library there are components that depend on @pm-netbank/libs-i18n therefore if @pm-netbank/components consumed SharedTranslationsProvider should be provided to the react apps.
Fetching the Shared translations
Similar to fetching the translations for apps as it described at Fetching the translations.
Command for fetching the shared translations is: yarn nx sync-translation pm-netbank/libs-i18n
Gatsby configurations
There are two files that are always in the app, in order for gatsby to work properly: gatsby-browser.js and gatsby-ssr.js.
These files contain the instructions for gatsby and must have a function called wrapPageElement, which allows a plugin to wrap the page element.
Check gatsby documentation for more information.
In order to keep the gatsby untouched and move all implementation bits to inside the src folder, should be created a folder called gatsby-wrappers which will contain the wrappers to use in the gatsby function enumerated above.
With that, the files will look like this:
gastby-browser.js and gatsby-ssr.js
import React from 'react';
import { wrapAppElement } from '@dnb/app';
import Layout from '@dnb/layout';
import { PageElementWrapper } from './src/gatsby-wrappers';

export const wrapPageElement = wrapAppElement(({ element, props }) => {
  element = <PageElementWrapper {...props}>{element}</PageElementWrapper>;
  /**
   * Only for local app dev –
   * We wrap the app in the default styling Layout component
   */ if (!global.isRootApp) {
    return <Layout {...props}>{element}</Layout>;
  }
  return element;
});
gatsby-wrappers/index.js
import React from 'react';
import { IntlProvider } from 'react-intl';
import { ApiHandlerProvider } from '@dnb/api-handler';
import { DynamicRoutingProvider } from '@dnb/dynamic-routing';
import ErrorBoundary from '@dnb/error-boundary';
import Head from '@dnb/helmet';
import { getIntlConfig } from '@pm-netbank/services';
import { translations } from '../services/i18n';

/**
 * This is where you can declare all the providers your components need.
 *
 * In the PageElementWrapper you will receive all the dynamic path parameters
 * as described in the /pages folder structure, where any folder or file
 * called `[paramName].tsx` would result in `paramName` being passed to this
 * function as a dynamic parameter.
 *
 * NB: `paramName` is case sensitive.
 *
 * These parameters will then be passed to the routing provider and used to
 * determine which component to render.
 *
 * See the DynamicRoutingProvider for more information.
 *
 * This is being used in gatsby-browser.js and gatsby-ssr.js to render this
 * application.
 */ export function PageElementWrapper({ children, params }) {
  return (
    <DynamicRoutingProvider basePath="/myApp" parameters={params}>
      <IntlProvider {...getIntlConfig(translations, 'nb-NO')}>
        <ErrorBoundary>
          <ApiHandlerProvider>
            <AccountsDataProvider>
              <CardsDataProvider>{children}</CardsDataProvider>
            </AccountsDataProvider>
          </ApiHandlerProvider>
        </ErrorBoundary>
      </IntlProvider>
    </DynamicRoutingProvider>
  );
}
Routing and Navigation
The routing structure is declared using a structure of folders and files, where each path represents a route and the file contains the component that will be rendered in that path.
The route structure should be placed under /pages and the root components to be rendered in each one of the routes, should be placed under /components.
Example: Show a payments list under the URL dnb.no/payments
// /pages/payments/index.tsx

export default function PaymentsListPage() {
  return <PaymentsListRoute />;
}
// /components/PaymentsListContainer.tsx

export default function PaymentsListContainer() {
  return (
    <>
      <H1>This is a Payments List</H1>
      <PaymentsListComponent />
    </>
  );
}
Follow the best practices for routing and navigation provided by the framework, available at dnb-web/docs/RoutingAndPages.md and use the @dnb/dynamic-routing to handle dynamic parameters and navigation.
Side panel Routes
This is a specific routing case that needs a slightly different approach.
To render these pages properly, it is necessary to render two routes: the background one and the side panel one.
Example: In an application with a list of payments, show the details of one of the payments in a side panel (under the URL dnb.no/payments/76123GY62)
// /pages/payments/[paymentId].tsx

export default function PaymentsDetailsPage() {
  return (
    <>
      <PaymentsListContainer />
      <PaymentsDetailsContainer />
    </>
  );
}
// /components/PaymentsDetailsContainer.tsx

export default function PaymentsDetailsContainer() {
  return (
    <>
      <H1>This is a single Payment</H1>
      <PaymentsDetailsComponent />
    </>
  );
}
Data Formatting
Ordinal Numbers
In some scenarios, we may need to display ordinal numbers like 1st, 2nd, 3rd, 4th, etc based on language.
In this scenario, you can make use of getOrdinal function from @pm-netbank/services.
Example
import { getOrdinal } from '@pm-netbank/services';

const englishFirst = getOrdinal(1, 'en-GB'); /* 1st */
const englishSecond = getOrdinal(2, 'en-GB'); /* 2nd */
const englishThird = getOrdinal(3, 'en-GB'); /* 3rd */
const englishFourth = getOrdinal(4, 'en-GB'); /* 4th */
const norwegianFirst = getOrdinal(1, 'nb-NO'); /* 1. */
const norwegianSecond = getOrdinal(2, 'nb-NO'); /* 2. */
const norwegianThird = getOrdinal(3, 'nb-NO'); /* 3. */
const norwegianFourth = getOrdinal(4, 'nb-NO'); /* 4. */
Formatting Money
There are many places we need to format number values. If we have a Money object we want to display we should use the shared component FormattedMoney.
Why? If we use the shared component we don't need to test the formatting in every single component, and we have a standard way of displaying money in our application. If the underlying Eufemia component changes, we only have to refactor the shared component.
const money: Money = { value: '100', currency: 'NOK' };

// Bad
<NumberFormat currency={money.currency} currency_display="symbol">
  {money.value}
</NumberFormat>;
// Good
<FormattedMoney money={money} />
Routing
When navigating to another page or between apps, we should use the routing definition library @pm-netbank/routing.
Why? It makes it easier to change routes at a later stage instead of hard coding all routes in the apps. This will also allow us to use different paths for the user's language.
// Bad
import { DynamicRoutingContext } from '@dnb/dynamic-routing';

class MyComponent extends React.Component {
  const { navigateTo, cardId, cardOwnershipType } = useContext(DynamicRoutingContext);

  function navigateToPage() {
    navigateTo(`cards/${cardOwnershipType}/${cardId}/details`);
  }
}

// Good
import { DynamicRoutingContext } from '@dnb/dynamic-routing';
import { cardRoutes } from '@pm-netbank/routes';

function MyComponent({ myProperty }: Props) {
  const { navigateTo, cardId, cardOwnershipType } = useContext(DynamicRoutingContext);

  function navigateToPage() {
    navigateTo(cardRoutes.cardInfoDetails(cardOwnershipType, cardId));
  }
}
Page titles
The page title (tab title) should always be on the format "APPNAME/PAGE_TITLE" | DNB. So for the Accounts list this should be Accounts | DNB.
We have a shared component called PageTitle, that handles this for us. We use this when we want to set a page title.
Why? We want the titles to be consistent in every page, and to follow our guidelines for page titles
// Bad

return (
  <>
    <title>This is my title</title>
  </>
);

// Good
import { PageTitle } from '@pm-netbank/components';

// ...

const intl = useIntl();
return (
  <>
    <PageTitle titleTRanslationKey={translattionKey.appName.key} />
  </>
);